How to make a DLL with VB.NET Standard Edition
by George Poth
When you ask in forums
which edition of Microsoft Visual Basic .NET you should buy, most experienced
programmers will tell you to go for anything but the standard edition. Why?
Well, they say that you can't make .dll's and all the
good pro stuff with the standard edition. I got news for you: you can make your
.dll's with the standard edition. In fact, you can use
the Class Library, Windows Control Library, Web Control Library, yep, and even
Windows Service.
In this tutorial, I will
show you how you can produce your .dll. Don't expect something complicated. Our
example here will be a simple button, so if you want something more elaborated
than that, you will have to work that out on your own. By the way, when you're
through with this one, go to Ged Mead's tutorial on how to make
a custom control; this gets you some more practice.
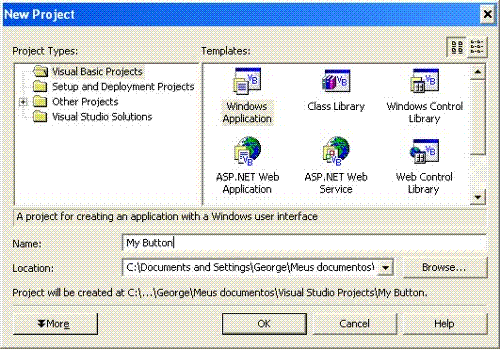
Start a new Windows
Application project and give a name; "My Button" will be fine here.
This should look like in Figure 01.
(Figure 01)
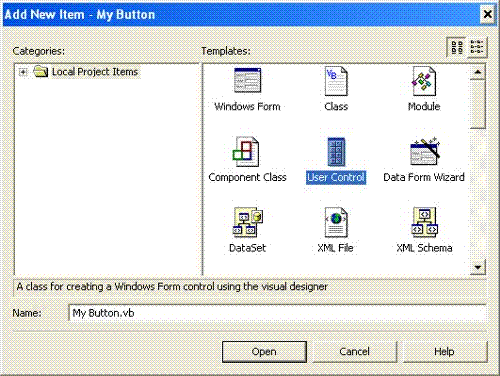
From the file menu,
select "Add New Item", or press Ctrl + Shift + A to do the same. This
will open the "Add New Item - My Button" window. In the "Add New
Item" window, select the User Control template and name it "My
Button.vb" as shown in Figure 02. Click to open it.
(Figure 02)
A user control doesn't
have any borders. That's because it serves as a carrier. Insert a button and
adjust the following button properties:
|
Right click the button
and select "View Code". Select btnExit from the Class Name list and
MouseEnter from the Method Name list. Edit the generated code so that it looks
like Code 01
Code 01
Private Sub btnExit_MouseEnter(ByVal sender As Object, _
ByVal e As System.EventArgs) Handles btnExit.MouseEnter
'[Change the properties when the mouse enters]
btnExit.Text = "Click here"
btnExit.BackColor = Color.White
btnExit.ForeColor = Color.Red
'[Change the properties when the mouse enters/]
End Sub
Now select btnExit from
the Class Name list and MouseLeave from the Method Name list. Edit the code so
that it looks like Code 02.
Code 02
Private Sub btnExit_MouseLeave(ByVal sender As Object, _
ByVal e As System.EventArgs) Handles btnExit.MouseLeave
'[Reset the properties]
btnExit.Text = "Exit"
btnExit.BackColor = Color.Red
btnExit.ForeColor = Color.White
'[Reset the properties/]
End Sub
Select btnExit from the
Class Name list and MouseLeave from the Method Name list. Edit the code so that
it looks like Code 03.
Code 02
Private Sub btnExit_Click(ByVal sender As Object, _
ByVal e As System.EventArgs) Handles btnExit.Click
'[Close the program]
Application.Exit()
'[Close the program/]
End Sub
Go back to design view
and adjust the size of the user control to the same size of the button. If you
haven't changed the size of the button, then it should be 75; 23, but you
should check that out as it might be different. When you're finished with that,
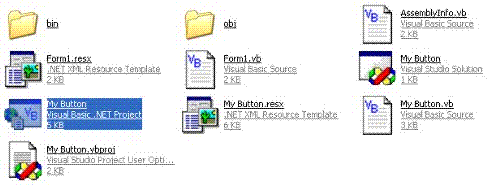
go to the folder of your program which should look approximately like the one
in Figure 03.
(Figure 03)
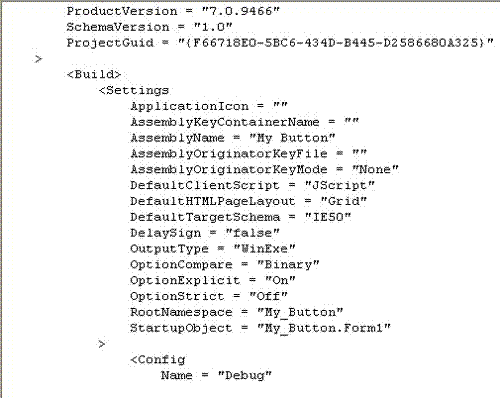
Right click the project
file, which appears selected in Figure 03. You might have to look out for the
.vbproj extension. Select to open the file with Notepad. You will see the items
as in Figure 04.
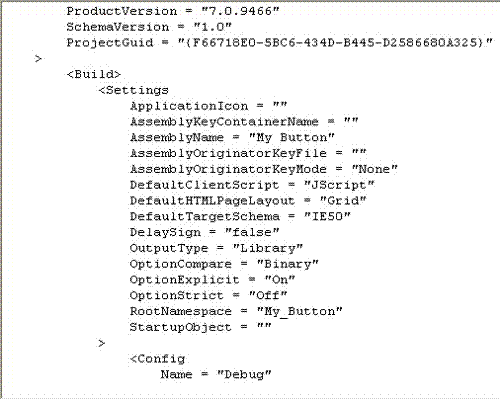
(Figure 04)
Change the OutputType =
"WinExe" to OutputType = "Library", and the StartupObject =
"My_Button.Form1" to StartupObject = "". When you have
edited these items, the section should look like the one Figure 05.
(Figure 05)
Make sure there aren't
any spelling mistakes and then save the changes and close the file. Now go back
to the editor. The editor will tell you that the project has been modified
outside the IDE. Click "Reload" and then rebuild your project. Now
open the bin folder of your program and you will see the .dll like in Figure
06.
(Figure 06)

You can copy your newly
created .dll into a separate folder reserved for dll's. However, it's not a
good idea to delete the original project as you wouldn't be able to make
changes later. You will soon find the way that works best for you.
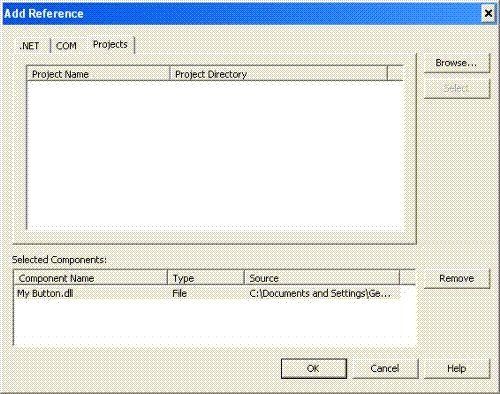
Create a new project
with the name "My dll Test" or something similar. Right click
"My dll Test" in the solution explorer and select "Add
Reference". Select the "Projects" tab and browse for your .dll
in your newly created "DLL Library" folder. Double click the .dll so
that it will be added to the selected components as shown in Figure 07.
(Figure 07)
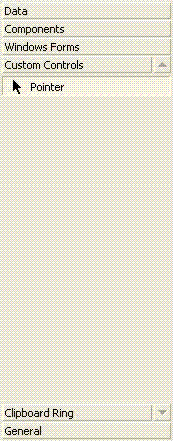
When you have done so,
click "OK". Now right click the toolbox and select "Add
Tab". Type "Custom Controls" and then click
anywhere on the toolbox. Your toolbox could now look like the one in
Figure 08.
(Figure 08)
Right click the toolbox
and select "Customize Toolbox". The "Customize Toolbox"
window will take some moments to appear. Click the ".NET Framework
Components" tab and then browse to your .dll. Double click the file and it
will be added to the components list. This should look like in Figure 09.
(Figure 09)
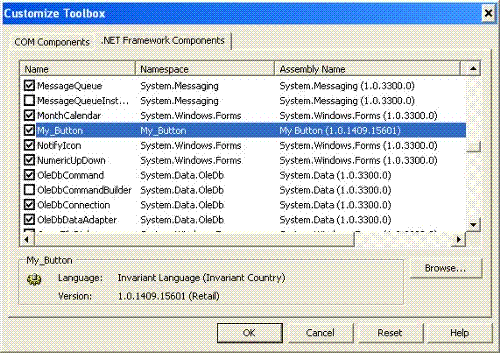
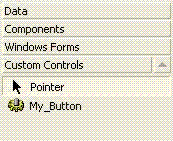
Make sure the checkbox
is checked and click "OK". You will now see "My_Button" added
to the toolbox as shown in Figure 10.
(Figure 10)
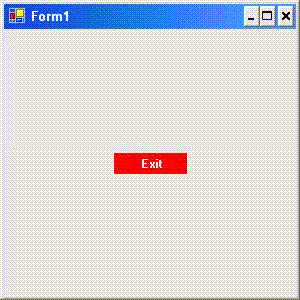
You can now double click
"My_Button" to put it on your form. Arrange the button so that it is
in an appropriate location and run your program. You will see the form with
your .dll as Figure 11 shows.
(Figure 11)
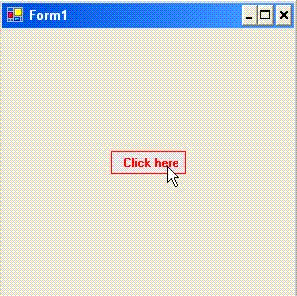
When your mouse goes
over the button, the text and the color will change as we coded it. This could
look like shown in Figure 12.
(Figure 12)
The button will also
close your program since we coded it to do so. The .dll will be copied to the
output folder of the program when you build or run the project; provided you
have referenced to it.
This example is very
basic, but with some imagination, only the sky is the limit. This tutorial also
proved one thing: you don't need the pro edition to make pro stuff. There are
ways to work around certain "limits" of the standard edition. So,
should you prefer the cheaper standard edition? Well, if your cash is shorter
than your months, yes. The same is true when you are just taking your first
steps because as a learning tool the standard edition is well worth it.
Otherwise, listen to those who make those ugh-faces when you talk about the
standard edition and get something better than this